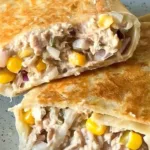
Tuna Melt Wrap
Tuna melt wrap is a delightful fusion of flavors that combines creamy tuna salad with melted cheese, all perfectly wrapped in a soft tortilla. It’s the kind of dish that can turn an ordinary day into something special, whether enjoyed as a quick weeknight dinner or a satisfying lunch. The warm, toasty texture melds beautifully with the savory tuna, making each bite a comforting experience that can be whipped up in no time.
Why you’ll love this dish
This tuna melt wrap stands out for its simplicity and deliciousness. It’s quick to prepare, making it ideal for those busy weeknights when you need something hearty yet easy. The combination of protein-rich tuna and gooey cheese will keep you feeling full and satisfied, while a few simple ingredients keep it budget-friendly. Plus, the wrap format makes it easy to eat on-the-go.
"This tuna melt wrap is my new favorite lunch! It’s so easy to make and tastes incredible. My kids can’t get enough!"
How this recipe comes together
Making a tuna melt wrap is straightforward. You’ll start by mixing up a creamy tuna salad, then layer it with your favorite cheese in a tortilla. A little grilling or toasting is all it takes to transform these ingredients into a warm, melty delight. In just a short time, you’ll have a fantastic meal that’s sure to please everyone at your table.
Ingredient breakdown
To create a delicious tuna melt wrap, the key ingredients are tuna, your choice of cheese, and a wrap or tortilla. The tuna serves as the protein base and should be well-drained for the best texture. For cheese, a melting variety like cheddar or Monterey Jack works wonders for that gooey finish. If you prefer a lighter option, consider using Greek yogurt in place of mayonnaise in your tuna salad. Tortillas offer a versatile base, but feel free to use gluten-free or whole grain alternatives depending on your dietary needs.
Directions to follow
To make your tuna melt wrap, begin by preparing your tuna salad by mixing canned tuna with your chosen ingredients. Once you have your salad ready, lay it on a tortilla, top it generously with cheese, and then fold it up. Cook the wrap in a skillet over medium heat until the tortilla is golden brown and the cheese has melted, which should take about 3-4 minutes per side. This ensures that you get a delicious crispy exterior with a warm, comforting interior.
Best ways to enjoy it
Serve your tuna melt wrap hot off the grill for a satisfying meal. You can slice it in half to showcase the melty cheese and tuna goodness inside. Pair it with a light salad or some crunchy veggie sticks for a well-rounded lunch or dinner. It’s also a great option to serve at gatherings when you want something quick yet impressive.
Keeping leftovers fresh
If you find yourself with leftovers of the tuna melt wrap, store them in an airtight container in the refrigerator for up to 2 days. When you’re ready to enjoy, reheat them in a skillet over low heat to ensure the tortilla remains crispy while the filling warms up. While it’s best fresh, these wraps can also be frozen for longer storage—just make sure to wrap them tightly to prevent freezer burn.
Pro chef tips
For best results, make sure not to overcrowd the pan when grilling your wraps. This ensures even cooking and helps achieve that perfect golden-brown crust. Taste your tuna salad before wrapping—it’s easier to adjust seasoning before it’s all put together. If you want to experiment with flavors, a dash of hot sauce or a sprinkle of your favorite herbs can add a delightful twist to the dish.
Creative twists
There are countless ways to customize your tuna melt wrap! For a Mediterranean vibe, try adding olives and capers. You can also switch up the cheese for a sharper flavor or use a whole wheat wrap for extra fiber. If you prefer a vegetarian option, consider making a chickpea salad using the same spices and techniques.
Common questions
How long does it take to prep?
Preparing the tuna melt wrap takes about 10-15 minutes, depending on your chopping and mixing skills. It’s a quick dish that can fit into any busy schedule!
Can I freeze the wraps?
Yes, you can freeze assembled wraps. Wrap each one tightly in plastic wrap before placing them in a freezer-safe container. They can be kept frozen for up to a month.
Can I substitute ingredients?
Absolutely! You can use canned salmon instead of tuna, or swap out the cheese for dairy-free alternatives. Greek yogurt can also be used in place of mayonnaise for a lighter option.
How should I reheat leftovers?
For the best texture, reheat in a skillet over low heat to warm thoroughly while keeping the wrap crispy. Avoid microwaving, as it can make the tortilla soggy.
Can I scale this recipe?
Definitely! Just multiply the amounts for each ingredient according to how many wraps you’d like to make. This recipe is easily adaptable for a crowd.
Tuna Melt Wrap

A delightful fusion of creamy tuna salad and melted cheese wrapped in a soft tortilla, perfect for lunch or dinner.
- Prep Time: 15 minutes
- Cook Time: 8 minutes
- Total Time: 23 minutes
- Yield: 2 servings
- Category: Main Course
- Method: Grilling
- Cuisine: American
- Diet: Pescatarian
Ingredients
- 1 can tuna, drained
- 1/4 cup mayonnaise or Greek yogurt
- 1/2 cup shredded cheese (cheddar or Monterey Jack)
- 2 large tortillas or wraps
- Salt and pepper to taste
- 1 tbsp olive oil (for cooking)
Instructions
- Mix the drained tuna with mayonnaise or Greek yogurt, and season with salt and pepper.
- Lay the tuna salad on a tortilla.
- Top it generously with shredded cheese.
- Fold the tortilla to enclose the filling.
- Heat olive oil in a skillet over medium heat.
- Cook the wrap for 3-4 minutes on each side until golden brown and cheese is melted.
Notes
For added flavor, consider sprinkling herbs or a dash of hot sauce in the tuna mixture. Customize with different vegetables or cheese to suit your taste.